As an Amazon Associate we earn from qualifying purchases.
Most of the electrical items start to attract dust after a certain amount of time. This starts to interfere with the smooth functioning of the machine and decreases the lifespan of the electronic. The same is the case with the Brother Printer; thus, we will discuss how to clean brother printer drums in this article.
Contents
-
How to Clean Brother a Printer Drum?
- Materials You Need to Prepare
- Step 1: Turn Off the Main Switch of the Brother Printer
- Step 2: Opening the Printer and Viewing the Components
- Step 3: Removing the Detachable Components from the Printer
- Step 4: Wiping the Toner Cartridge With an Activated Toner Cloth
- Step 5: Position the Toner Vacuum Into the Printer Chassels
- Step 6: Cleaning the Hard to Reach Nooks With a Paintbrush
- Step 7: Cleaning Up the Corona Wires
- Step 8: Basic Cleaning
- Frequently Asked Questions
- Conclusion
How to Clean Brother a Printer Drum?
If you are not maintaining the cleanliness of the Brother printer regularly, it can do severe damage to the printer. Thus in this article, we will discuss the in-depth methodology for cleaning the printer at home by yourself.
Materials You Need to Prepare
The cleaning process of Brother printer drums is a complex one and demands advanced equipment for cleaning.
Some of the tools are quite advanced, and it might be difficult for a newbie to get the hang of it. Here is the list of materials you need to prepare before you start cleaning the Brother printer drums.

- Toner vacuum: They are specifically required to clean the toner cartridges and trap the toner particles.
- Clean paintbrush
- Two toner cloths: They are necessary to trap the toner particles, and the activated nature can catch every little particle left in the toner cartridge.
- Cotton swabs: Regular cotton swabs can be used for wiping the cartridges.
- Rubbing alcohol: It is the main cleaning agent in the process, it works great for numerous applications like cleaning Juul pods, N64 cartridges, and card sleeves.
- Microfiber cloth: It is required to apply the rubbing alcohol in the cartridges.
- Face mask: It is necessary to protect yourself from any type of toner particles. These particles should enter your lungs.
- Latex gloves: They are necessary to keep your hands clean during the process.
The materials mentioned above are easily available in the market and are quite pocket-friendly and safe to use while cleaning.
On the other hand, the toner vacuum might be a bit expensive as it is one of the most advanced equipment that we are using in the cleaning process.
Step 1: Turn Off the Main Switch of the Brother Printer
Before starting the cleaning process, it is essential to let the printer cool down first. Thus it is essential to turn off the main switch of the Brother printer. Moreover, you will not want to electrocute yourself while cleaning your printer.
Make sure you switch the printer off at least one hour before the cleaning process.
Step 2: Opening the Printer and Viewing the Components
Once the printer is cooled down, you need to move on to the next step: opening the printer and viewing the components inside. Take your printer’s reader manual and see the instructions for opening up the printer.
Each printer is different, some might have latches or an opening hinge, and some might require a screwdriver to open up. Here is a link to the video guide for opening up the printer with a screwdriver.
Step 3: Removing the Detachable Components from the Printer
Once you have opened up the printer, you need to identify the detachable components in the printer.
Since we are deep cleaning, removing the detachable components from the printer is extremely important. Here are the items that you need to remove:
- With the help of your reader’s manual, identify and lift the all-in-one toner cartridge. If your printer is new and inexpensive, you will have one all-in-one toner cartridge.
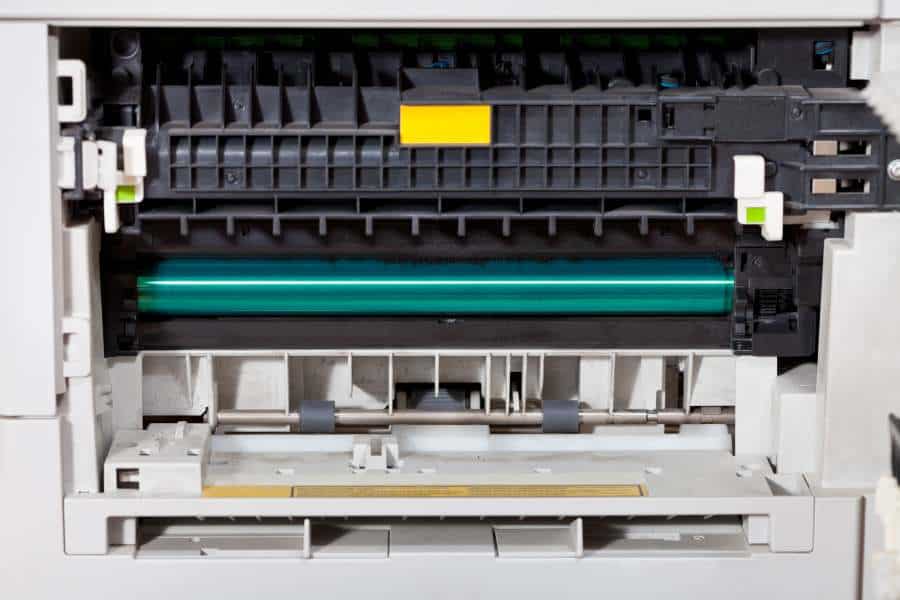
- Now identify and take the imaging drum out of the printer. It is either bright green or blue.
Make sure you grab the drum from each side, avoid touching the surface of the drum. Be very careful while lifting the imaging drum and place it in a dark area.
Here is the link to a study that discusses why the imaging drum is placed in an area with no light.
Step 4: Wiping the Toner Cartridge With an Activated Toner Cloth
Once the components of the printer are out, it is time to divide and conquer. You need to start with the toner cartridge first.
Thus, you need to follow the steps while wiping the toner cartridge with an activated toner cloth.
- Spread one activated toner cloth on the floor and place the toner cartridge over it.
- Now take another activated toner cloth and start wiping the toner cartridge slowly with minimal pressure.
One activated toner cloth will be enough to wipe the whole toner cartridge, but you must be careful while cleaning the toner cartridge. Here are some pointers that you should consider:
- First, make sure your face is fully covered; the toner particles are harmful if they enter the lungs.
- Second, make sure no toner particles are left on the floor, as they can be dangerous.
- Finally, it is recommended to cover your hands as well while cleaning.
Here is a link to the study highlighting the various effects of toner particles on the lungs if they enter the respiratory tract.
Step 5: Position the Toner Vacuum Into the Printer Chassels
Once the toner cartridge is finally clean, it is time to clean the printer chassels. You will need a toner vacuum for this; it is an advanced machine; thus, make sure you have your reader’s manual in hand.
Here are some pointers that you need to consider positioning the toner vacuum into the printer chassels:
- Go through the reader’s manual carefully and adjust the settings of the toner vacuum accordingly.
- Carefully place the toner vacuum in the printer chassels.
- Now switch the vacuum on and suck all the toner particles that were spilled into the printer chisels.
- Make sure you move the nozzle of the toner vacuum really slowly so that no spot is missed.
- Make sure you spend at least 3 seconds on each crevice.
At first, using the toner vacuum might seem scary, but if you follow the reader’s instructions carefully, it is just a piece of cake.
Step 6: Cleaning the Hard to Reach Nooks With a Paintbrush
Once we are done cleaning the bigger components of the Brother printer, it is time to move towards cleaning the hard-to-reach nooks with a paintbrush.
We cannot use a toothbrush or a scrub brush, as we may damage the printer.
Here are the steps that you will need to follow:
- Take the paintbrush in your hands and hold it at a certain angle so that it can reach the small corners easily.
- Now scrub those hard-to-reach nooks gently to loosen up any dirt or toner particles from the area.
- Now carefully use the toner vacuum and suck the particles loosen up by the paintbrush.
Step 7: Cleaning Up the Corona Wires
Once the toner particles are removed from the printer, it is time to clean up the wiring. Do not be afraid, and you will not be electrocuted, as the printer is switched off.
Here are the steps that you will need to follow for cleaning up the corona wires:
- Take a cotton swab and some rubbing alcohol.
- Dip the cotton swab directly onto the rubbing alcohol.
- Now identify the corona wires; they can be easily found around the paper rollers.
- Now rub the cotton swab on the wires and twist it when one side of the swab is covered with soil.
The main role of the corona wires is to attract the toner particles by releasing a static and help in printing, thus making sure you clean them well for seamless printing.
Step 8: Basic Cleaning
Since all the major items in the printer are being cleaned, it is time to move forward with the basic cleaning. Here are the steps you need to follow:
- Remove the dust from the internal fan using a can of condensed air.
- Eash the paper feed roll with some rubbing alcohol.
- Do not forget to disinfect the external surface of the printer with some rubbing alcohol.
- Now replace the inner components.
Now close the printer back and check if it is working fine. This cleaning routine is necessary to make sure the upcoming prints are not bad.
Nowadays, the printers are programmed to start their internal maintenance by themselves.
Frequently Asked Questions
Why Is My Brother Printer Printing Dirty Pages?
The primary reason is you have not cleaned your printer for quite a while, and the printer platen is dirty with ink. Here is why your Brother printer is printing dirty pages.
What Does It Mean When My Brother Printer Says Cleaning?
Your Brother printer is programmed to perform maintenance purges after a certain interval of time. It ensures printing quality. Here is the answer to what it means when my Brother Printer Says Cleaning.
Conclusion
The steps mentioned above might seem like a lot of work, but you need to do it for the better functioning of your Brother printer. If you skip the cleaning, your printer will not be there to provide you with fresh and clean prints for a very long time. In addition, these machines demand continuous maintenance and care; thus, make sure you provide the required attention to them.
